 Diane
Diane


In the current world, the trend around is constantly changing and things we thought would stay relatively standard, are no longer the same. The constant change in times and technology creates newer areas for innovation and people love to have the most latest and groundbreaking products for their personal use. One such product that completely took over the market is made by Apple – iPhone. iTunes Backup. It is probably the world’s most sought after phone.
Naturally, Apps and iOS needs constant updates. Apps and the System on the Apple devices constantly need to be updated on a regular but spread out a timely basis. These updates to the Apple iOS might be to introduce new features or even to get rid of old features or bugs.
Before such updates or on a regular timescale of your own choice, people tend to want to back up their iPhones. This is generally done to safeguard the data on one’s phone so it does not get lost and can be recovered easily, in case of faulty updates or mistakes.
iTunes and its Uses
iTunes is an app made to act as a bridge between Apple Devices and PCs. The app does various tasks to enable the ideal working of your phone including the transfer of media files and many other tasks. These days, however, one of the most important or main features that iTunes is used for is the backup of your Apple device data. This is a very easy way to make sure you can properly save all your important data, so you can restore it when the time comes.
Many people come into issues with the iTunes service when the iPhone won’t back up to the iTunes app. This is a common issue and it might take different forms. Even though iTunes is very good, errors and mistakes can still exist in most apps. So errors like, iTunes backup session failed or iPhone backup failed are sometimes displayed.

6 Solutions to Tackle the issue of Failed iTunes Backup
Unfortunately, there is no concrete way to solve this issue as Apple themselves have not made any actual troubleshooting process for the iTunes backup fail. This is where we come in, we will list various ways from which you can solve your backup problems. So your questions like how can I fix corrupted iPhone backup or can’t backup iPhone because backup session failed will be answered here.
1. Restart your Apple Device and your Connected PC (Mac or Windows)
The simplest and most common reason for a failed backup or an error stating that iTunes could not back up the iPhone because the backup session failed could be solved using the easiest way. All you need to do is restart your Apple device whose backup you need to recover and also to restart the PC to which you have connected it. Sometimes a fresh start on the devices does wonders.
Windows: Can be restarted by simply going to the start menu and then finding the power button on the right bottom side.

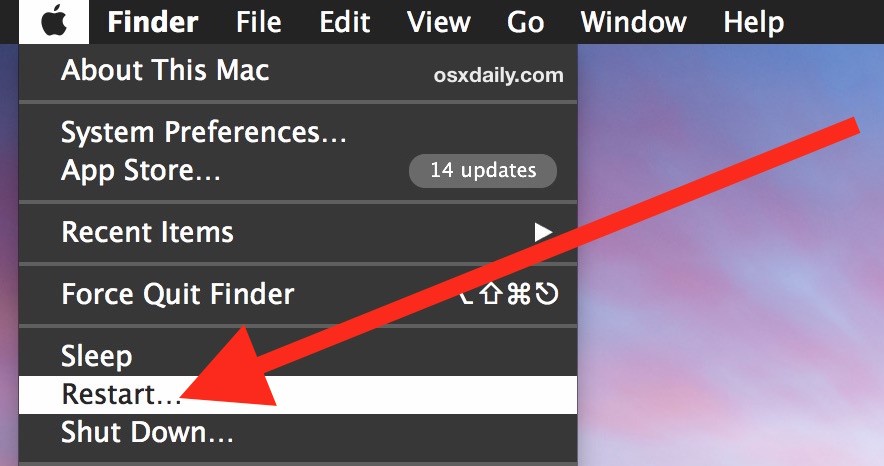
Mac Devices: Can be restarted by accessing the Apple menu on the top right and clicking on the restart option which appears there.
Restarting the iPhone:
For the latest iPhones like iPhone X or later, simply press the side button till the slider for power off option appears. Power it off and turn the phone back on after a few seconds by holding down the side button till the Apple icon displays.

Older iPhones such as version 8 or older can be restarted by pressing down the side or top buttons (according to your device) till the power slider option appears.

While this might not ensure that your issues will be dealt with, it is still extremely important and useful and can be done as the first step in your own troubleshooting process.
2. Update the iTunes Application
The second most efficient way to tackle the iPhone backup issue is to go to the root of your issue. You might want to update your version of iTunes to make sure you have the latest version running. Many app issues are simply there due to the fact that you might be running an older version of the app. Check the App for updates.
For Windows:
If you download the iTunes app from the Microsoft Store, the app you get will be auto-updated, so you won’t have any worries there as long as your Microsoft store is updated to the latest version.
But if you downloaded the app a little while ago, you will manually need to check it for updates. This can easily be done by:
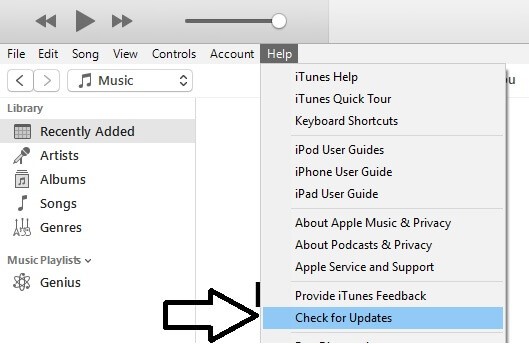
- Opening iTunes
- Select Help from the top menu in the iTunes app
- Now click “Check for iTunes update”
- If a new version is available you will be notified with a small message from which you can select download iTunes.
For Mac Devices:
The initial way to do so is the same as in the case for Windows, where all you will have to do is follow the same 4 steps as those listed above.
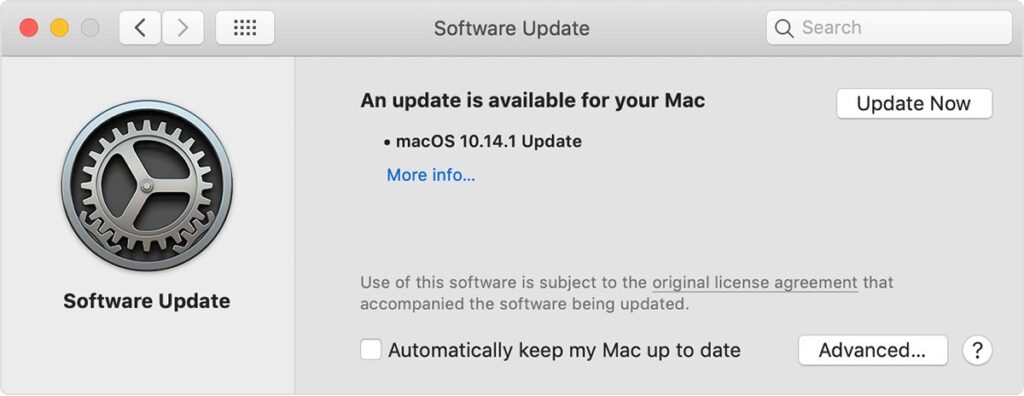
Another way is to go to the Apple menu on the top right and select system preferences. Next, you will have to click system update to verify whether or not you have the latest version for all your Mac apps. If a download option appears you can confirm it otherwise your apps are of the latest version.
It might even be worthwhile to reinstall the iTunes app by removing it on your PC or Mac. This new fresh install might take away old bugs or errors which were found in your previous installation.
3. Windows Security or Anti Virus Issues
One of the most common and frustrating issues with most apps is generally caused by Windows security or Anti Virus programs on your system. The job of the Security apps is to ensure no malware enters your system and you can continue enjoying proper working of your stuff.
In doing such a service for the users, these apps sometimes quarantine or disallow certain files of an app or the app itself from properly working as they feel like the app is suspect. This is a very common mistake as far as security apps go.
One of the best ways to handle this would be to disable your Windows firewall or Anti Virus firewall for a temporary basis. Turning the firewalls off for the time in which you will do your backup might lead to the backup being successful. The firewall sometimes makes it so that some apps are not allowed to use the internet; this might be why your iTunes is not being able to get the backup files.
You can also add iTunes as an exception to your Windows security and your Antivirus, this way the apps will acknowledge the app as trusted and will not interfere with its work.
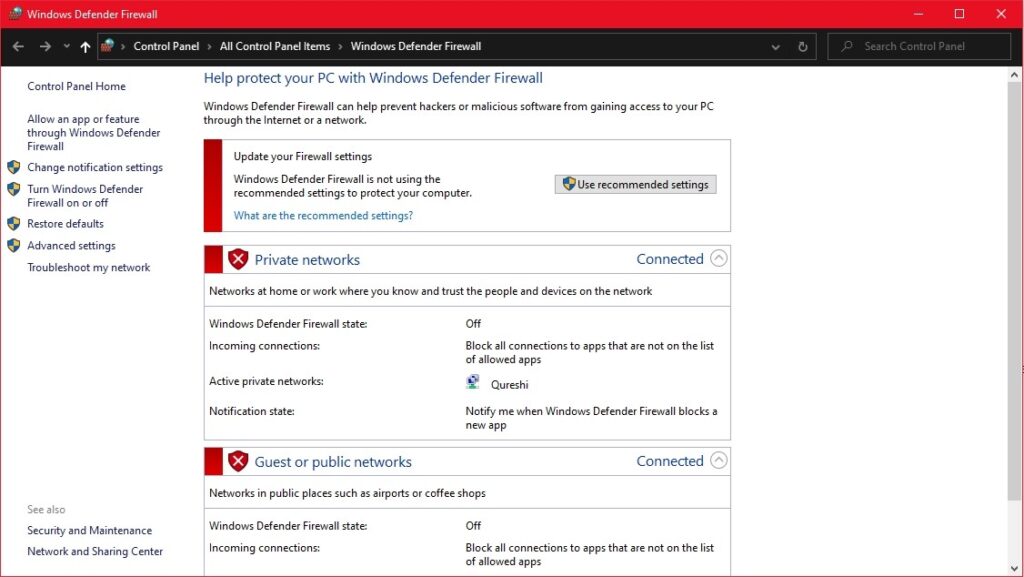
How to Allow an app through the Firewall:
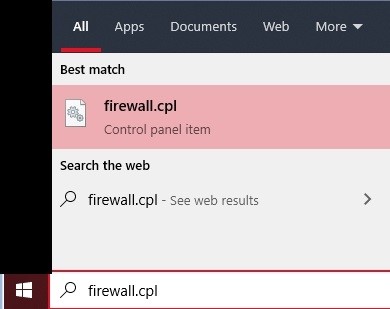
- Go to the Firewall menu in Control panel by Searching firewall.cpl in the search box in the taskbar or by pressing the Control + Esc keys at the same time.
- Once the menu is open, you will have to select the option of allowing an app through the firewall. This will be located on the left side of your window.
- Change settings> you will have to double-check whether or not you allow iTunes on both private and public networks. Allowing the app through both kinds of networks on the firewall is best.
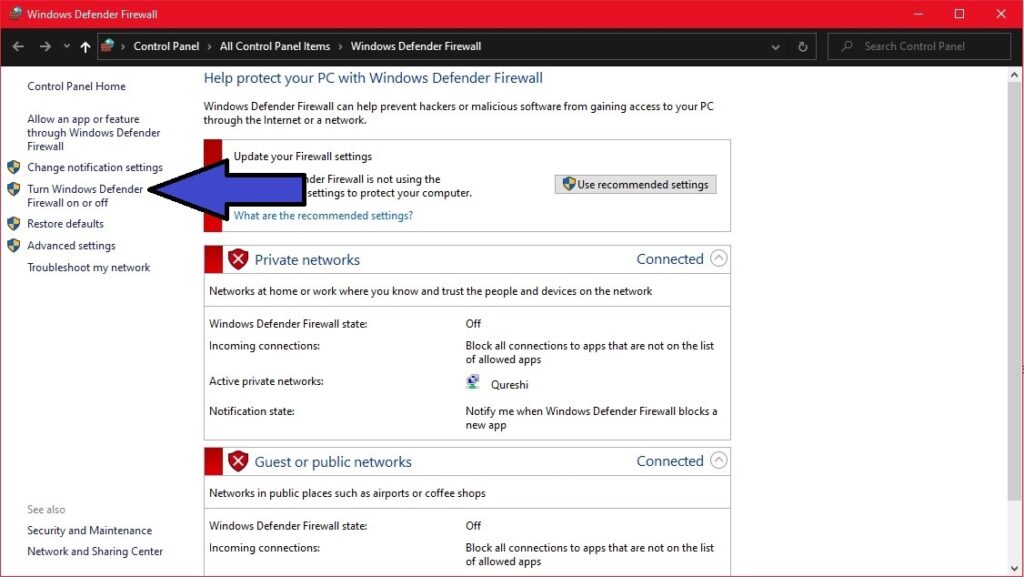
Disabling the Windows Defender:
- You can disable the windows firewall from the same menu you found the Allowing an app option from.
- This time you will select the Turn off the windows defender option from the left side instead of allowing an app through the firewall option.
- Turn the Defender off for both the two kinds of modes it is on for.
- Always remember to turn on the defender once your backup process is complete. This is a very important way to keep your PC safe from malware and other harmful viruses.
4. Reset Lockdown Folder
Another reason why the sync session failed to start might be because of iTunes not getting appropriate permission from your PC to access the backup. This is a usual occurrence as privacy is at stake here and there cannot be any compromises for that. You will have to reset your lockdown folder to ensure it has the required permissions or certificates to access the backup.
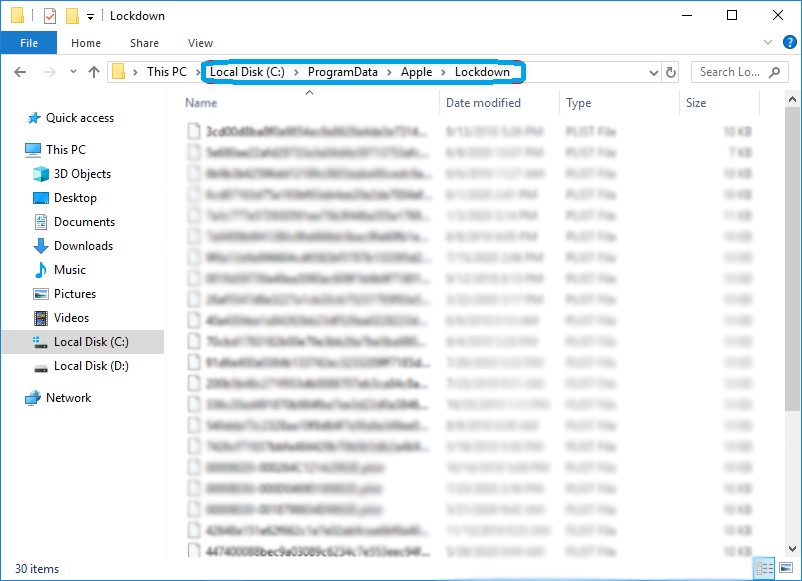
How to Reset the lockdown folder:
- Quit or exit the iTunes app, ensure it is properly closed.
- Disconnect your iPhone device from your computer.
- Find the lockdown folder on your computer. This will usually be accessed by going to C drive> ProgramData > Apple > Lockdown.
- Sometimes there will be hidden items here as well so be sure to check the show hidden icons feature on your system.
- You will have to delete everything in this folder to make sure the resetting process goes right.
- Connect your iPhone to your computer once more after the steps above.
- Try to backup your data once more
5. Choose an Alternative instead of the iTunes
If the iTunes backing up process is getting on your nerves a bit too much you can always resort to other ways to backup your iPhone device. Most commonly people use the iCloud service for this reason as it is the most accessible and reliable. Sometimes the backup might fail because your data might be damaged or unreadable for the iTunes app. In such cases, you will need to turn to apps designed to back up such files.
You will have to download 3rd party software to tackle such cases and if you choose to do so you might find it good knowing there are plenty of good and trusted backup apps. There are great apps such as the Tenorshare iCarefone or the AnyTrans app. These apps are dedicated to creating and accessing any backup data you make or choose to make in the future.
Naturally, the working of all different apps will differ from one another but you should be able to manage your way through them.
- If you want to create a backup you will click on the “create a backup” option. It might not be named in the same way but it will mean the same thing in different apps.
- You can also restore any backups you have already made and if you are in luck, such an app might be able to restore your backup which was troubling you.
- Note that these kinds of apps will not be free and you will have to purchase their services.
6. Repair iTunes
If none of the above solutions did the trick for your issue then you can try the final sure shot solution. This should only be performed if all the other solutions did not work for you and not before that.
Luckily for us, there are many different software or applications which perform the task of repairing or finding and repairing bugs which are making your iTunes perform in a way that is unacceptable for you. There are good reputable apps that have come to the aid of many struggling backup recovery people.
The process for apps differs in ways but the main way they operate is still very similar. Apps like Anyfix and Tenorshare, Tunescare are some of the most well-known services in the market right now.
- Download the app which you choose to solve your backup issue.
- Connect your iPhone with your computer and open the repair app.
- Choose the backup solver feature; this can be termed as a backup recovery tool or backup bugfix or something similar.
- If it works well for you but if your backup still fails try selecting the find and fix all errors or bugs feature on your repair tool app.
Final Thoughts
In the end, going through all of the solutions above should be able to get you to your backup files. You will not have to worry about losing important data, contact info, or photos of your loved ones. Can’t backup iPhone because backup session failed? Why is my iPhone backup session failed? Questions such as those will now be answered and hopefully, you will now have all the information you need to backup your iPhone files.
Lastly, always start with the most simple and basic steps such as restarting or updating. Move on to the more complex tasks and if all else fails use the 3rd party tools to find and backup your files. If your iTunes backup session failed, you can easily tackle this issue with the solutions above.
 Adrienne Blanier


 Adrienne Blanier


 Ronald Uy


 Leah H. Blanchard


0 Comments