Welcome, iPad enthusiasts! If you’ve ever found yourself running out of space on your used iPad or just wondering how you can access more files on the go, you’re in the right place. Today, we’re diving into the world of iPad External Storage, a game-changer for anyone looking to expand their iPad’s capabilities.
Now, we know that the iPad is a fantastic tool, perfect for everything from watching movies and browsing the web to getting some serious work done. But, as many of us have experienced, there comes a time when the internal storage just doesn’t cut it anymore. Whether it’s those high-resolution photos, extensive music libraries, or important work documents, we all need a little extra space sometimes.
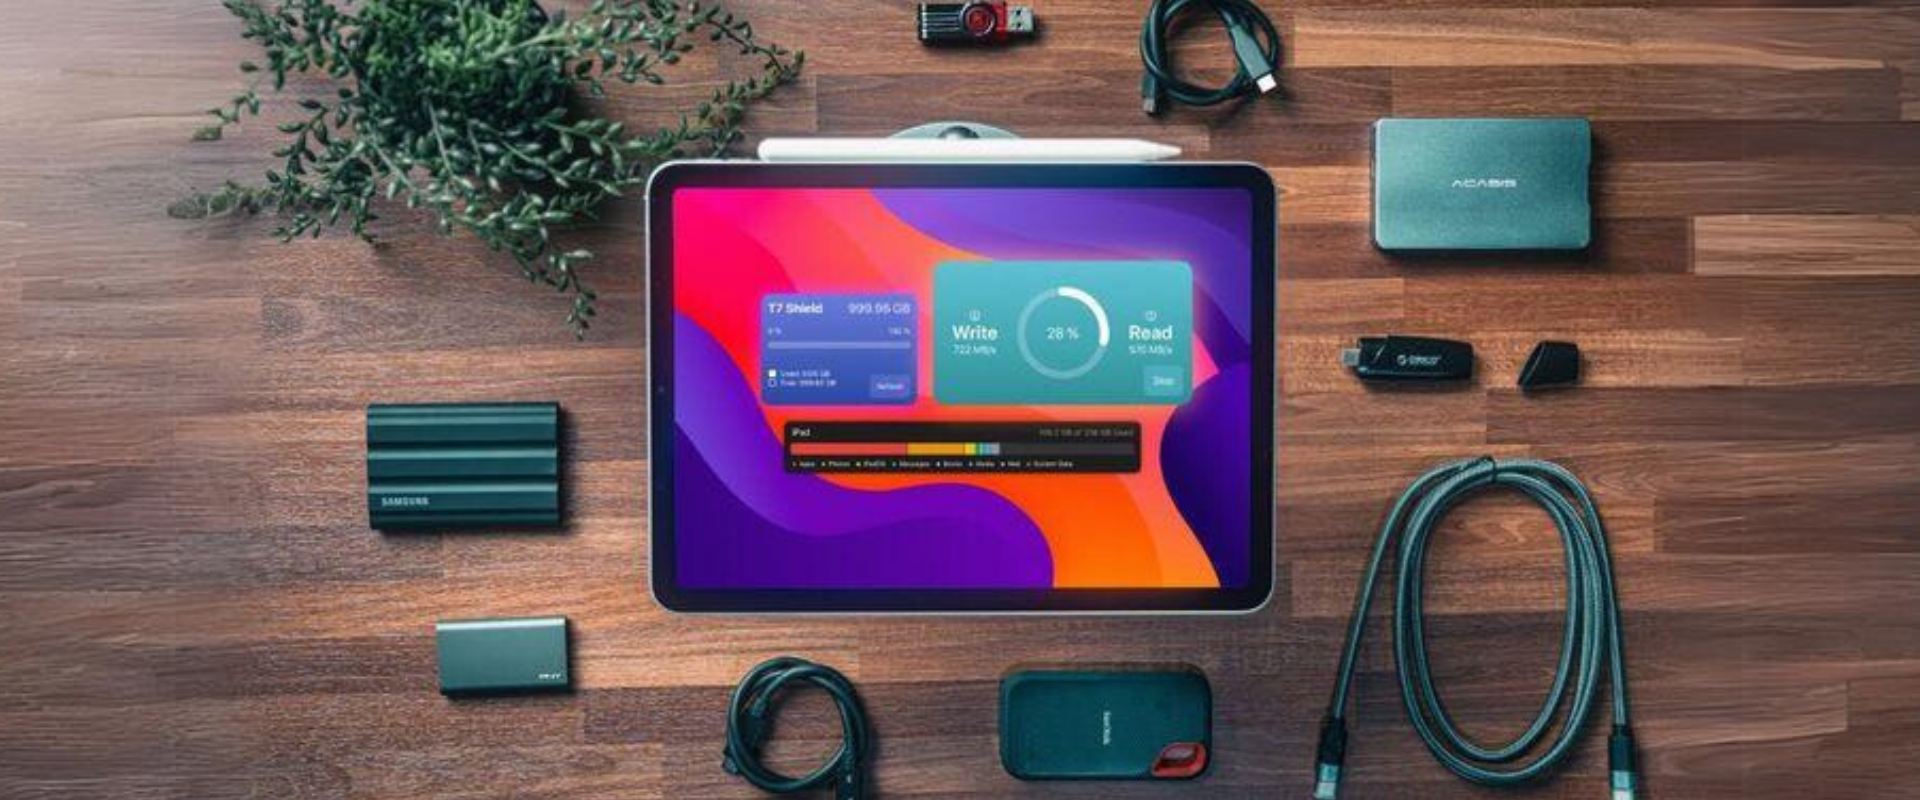
With the introduction of iPadOS, Apple has blessed us with the ability to connect external storage devices directly to our iPads. Yes, you heard that right! This means you can access files, photos, and videos from supported Apple accessories such as external hard drive, SSD, or even a USB stick, right from your iPad. It’s like giving your iPad a whole new lease on life!
In this comprehensive guide, we’re going to walk you through everything you need to know about expanding your iPad’s storage. From compatibility and requirements, all the way to managing your files and ensuring your data’s security, we’ve got you covered. So, grab your iPad, get comfortable, and let’s embark on this journey to unlock your iPad’s full potential!
Compatibility and Requirements
Before we dive into the nitty-gritty of connecting external storage devices to your iPad, let’s make sure your device is ready to roll. Not all iPads are created equal, and there are a few boxes we need to tick to ensure a smooth experience.
iPad Models and Compatibility
First things first, let’s talk about which iPad models are compatible with external storage. If you’re rocking an iPad Pro, any model from 2018 onwards is good to go. For those with an iPad Air, you’ll need the 3rd generation or newer. iPad mini? 5th generation or later will do the trick. And lastly, if you have a standard iPad, you’ll need the 7th generation or newer.
Required iPadOS Version
Next up, your iPad needs to be running iPadOS 13 or later which includes the iPad 5th Gen. This is the magic software that introduced the ability to connect external storage devices. To check your iPad’s software version, head to Settings > General > About, and you’ll see the software version listed there. You could also check our article on ‘What’s New with the iPadOS 17‘ to get the complete list of supported iPad models.
Necessary Hardware
Now, let’s talk hardware. Depending on your iPad model, you might need an adapter to connect your external storage device. Here’s a quick rundown:
- USB-C iPads (iPad Pro 2018 and newer): These can connect directly to USB-C external drives. If your drive is USB-A, you’ll need a USB-C to USB-A adapter.
- Lightning iPads (other models): You’ll need a Lightning to USB 3 Camera Adapter, which also has an extra port to connect a power source—a crucial step for some external drives that need more power.
Pro Tip: Always opt for genuine Apple adapters or trusted third-party options to ensure compatibility and reliability.
Now that we’ve got the compatibility and hardware requirements out of the way, you’re one step closer to expanding your iPad’s storage capabilities. In the next section, we’ll explore the different types of external storage devices available and help you choose the best one for your needs.
Types of External Storage Devices
Alright, now that we’ve ensured your iPad is ready to connect to external storage, let’s talk about the different types of storage devices available. Each has its own set of pros and cons, and the best choice for you will depend on your specific needs.
Hard Drives (HDD)
- Pros: Hard drives offer a lot of storage space at a relatively low cost. They’re great for backing up large amounts of data.
- Cons: They are bulkier than other storage options and have slower data transfer speeds. They also have moving parts, which can make them more susceptible to damage.
Solid State Drives (SSD)
- Pros: Apple SSD are faster, more durable, and more reliable than HDDs. They have no moving parts and can handle being jostled around a bit.
- Cons: They tend to be more expensive than HDDs, especially for higher storage capacities.
Flash Drives (USB Sticks)
- Pros: Flash drives are extremely portable and easy to use. Just plug them in, and you’re good to go. They’re also quite affordable.
- Cons: They generally offer less storage space than HDDs or SSDs.
SD Cards
- Pros: If your iPad has an SD card slot (or you have an adapter), SD cards are a compact and portable storage option.
- Cons: Like flash drives, they usually provide less storage space than HDDs or SSDs.
Network Attached Storage (NAS)
- Pros: NAS devices allow you to access your files over a network, meaning you can get to your data from multiple devices, not just your iPad.
- Cons: They can be more complex to set up and are generally more expensive.
Cloud Storage
- Pros: Services like iCloud, Dropbox, or Google Drive allow you to access your files from any device with an internet connection.
- Cons: You’ll need an internet connection to access your files, and there can be ongoing subscription costs.
Key Takeaway: The best storage option for you will depend on your specific needs. If you need a lot of storage space and don’t mind a larger device, an HDD might be the way to go. If you need something more portable and are willing to pay a bit more for speed, an SSD or flash drive could be perfect. And if you want to access your files from multiple devices, consider a NAS or cloud storage.
In the next section, we’ll guide you through the process of connecting your chosen external storage device to your iPad and getting everything set up.
Connecting External Storage to iPad
Now that you’ve picked out your perfect external storage companion, it’s time to get everything connected and up and running. Don’t worry, it’s a breeze, and I’ll walk you through it step by step.
Step 1: Connect the Storage Device
- USB-C iPads: If your external storage device has a USB-C connector, you can plug it directly into your iPad. If it has a USB-A connector, use a USB-C to USB-A adapter.
- Lightning iPads: Use the Lightning to USB 3 Camera Adapter to connect your storage device. If your device needs more power, plug in a power source to the adapter.
Step 2: Open the Files App
Once your storage device is connected, open the Files app on your iPad. You should see your external storage listed under “Locations.” Tap on it to view the contents.
Step 3: Manage Your Files
Now you can browse, open, and manage files just like you would on your iPad’s internal storage. You can also move files between your external storage and your iPad.
Troubleshooting Tips
- If your external storage device isn’t showing up, make sure everything is connected properly and that your storage device is formatted correctly (more on this in the next section).
- If your device requires more power, ensure that a power source is connected.
Pro Tip: Boldly label your external storage device. This can help you easily identify it in the Files app, especially if you connect multiple storage devices.
Ejecting Your Storage Device
When you’re done using your external storage, it’s important to eject it properly to avoid any data corruption. Here’s how:
- In the Files app, tap on the eject icon next to your external storage under “Locations.”
- Once it disappears from the list, you can safely disconnect the storage device from your iPad.
And there you have it! You’ve successfully connected and managed external storage on your iPad. In the next section, we’ll dive deeper into managing your files and making the most out of your new storage capabilities.
Managing Files on External Storage
Congratulations! You’ve successfully connected your external storage to your iPad. Now, let’s talk about how to manage those files effectively. The Files app on your iPad makes this process intuitive and straightforward, even if you’re not a tech whiz.
Navigating the Files App
- Viewing Files: Once you open your external storage under “Locations” in the Files app, you’ll see a list of all your files and folders. Simply tap on a file to open it, or tap on a folder to view its contents.
- Organizing Files: You can create new folders to keep your files organized. Just tap and hold in an empty space, select “New Folder,” and give it a name. To move files around, tap and hold on a file, then drag it to the desired location.
Opening and Editing Files
- Compatible File Types: You can open and edit a variety of file types directly from the Files app, including PDFs, photos, videos, and documents.
- Using Other Apps: If you need more advanced editing options, you can open your files in other apps on your iPad. Just tap and hold on a file, select “Share,” and choose the app you want to use.
Saving Files to External Storage
- From the Files App: To save a file from your iPad to your external storage, simply drag and drop it to the desired location in the Files app.
- From Other Apps: If you’re working in another app, look for the “Save” or “Export” option, and choose your external storage from the list of locations.
Deleting and Managing Space
- Deleting Files: To delete a file, tap and hold on it, then select “Delete.” Remember, this will permanently remove the file from your external storage.
- Checking Storage Space: To see how much space is available on your external storage, tap on the name of the storage under “Locations” in the Files app.
Pro Tip: Regularly back up important files. Even though external storage is reliable, it’s always a good idea to have backups of your most important files, just in case.
File Formats and Compatibility
- Ensure your external storage is formatted in a way that’s compatible with both your iPad and any other devices you plan to use it with. Most storage devices come pre-formatted in a compatible format, but you can reformat them if needed (be aware that reformatting will erase all data on the device).
And there you have it! You’re now a pro at managing files on your external storage with your iPad. In the next section, we’ll explore some of the ways you can make the most out of this newfound storage freedom.
Use Cases and Benefits
Now that you’ve got the hang of connecting and managing external storage on your iPad, let’s delve into some practical scenarios where this feature truly shines. Whether you’re a creative professional, a student, or just someone who loves having their entire digital life at their fingertips, external storage for your iPad is a game changer.
For the Photographers and Videographers
- Store and Edit on the Go: With an external SSD, you can carry your entire photo and video library with you, making on-site editing a breeze.
- Backup Your Masterpieces: Use your external storage as a backup solution to ensure your work is safe and sound.
For the Students and Professionals
- Carry All Your Documents: Keep all your important documents, presentations, and research papers in one place, accessible anytime, anywhere.
- Collaborate with Ease: Share files with classmates or colleagues by simply handing off your external storage.
For the Entertainment Lovers
- Expand Your Media Library: Store more movies, music, and eBooks than your iPad could ever hold on its own.
- Play Media Directly: Watch movies or listen to music directly from your external storage, no need to transfer files to your iPad.
For Everyone
- Extra Backup: Use external storage as an additional backup option for your most important files.
- Easy File Transfer: Transfer files between your iPad and other devices with ease.
Benefits of Using External Storage
- Cost-Effective: Expanding your storage with an external device can be more cost-effective than buying a new iPad with more storage.
- Flexibility: Easily switch between multiple storage devices depending on your needs.
- Portability: Many external storage options are compact and easy to carry, ensuring you have access to your files wherever you go.
Pro Tip: Label your storage devices based on their content (e.g., “Work Documents,” “Movies”) for quick and easy access.
By harnessing the power of external storage, your iPad becomes an even more versatile tool, ready to tackle anything from professional work to entertainment on the go. In the next section, we’ll discuss how to ensure your data stays safe and your experience remains smooth.
Performance and Speed
Now that you’re all set up and making the most out of your iPad’s external storage capabilities, let’s talk about performance and speed. After all, we want to ensure that your experience is not just seamless, but also snappy!
Choosing the Right Storage for Speed
- SSDs for the Win: If speed is a top priority for you, SSDs (Solid State Drives) are the way to go. They offer faster read and write speeds compared to HDDs (Hard Disk Drives), meaning your files will open and transfer quicker.
- USB Versions Matter: Pay attention to the USB version of your storage device and adapter. USB 3.0 and above offer faster data transfer speeds than older USB versions.
Optimizing Performance
- Keep Your Software Updated: Ensure your iPadOS is up to date to take advantage of any performance improvements and bug fixes.
- Properly Eject Storage: Always eject your external storage properly before disconnecting it to prevent data corruption and ensure optimal performance.
Managing Large Files
- Patience is Key: Transferring large files or a large number of files can take time, especially if you’re using an HDD or an older USB version.
- Consider Your Needs: If you frequently work with large files, investing in an SSD and ensuring you have a fast USB connection can save you a lot of time in the long run.
Troubleshooting Speed Issues
- Check Your Connections: If your storage device is underperforming, ensure all connections are secure and that you’re using the right adapters and cables.
- Format Correctly: Make sure your storage device is formatted correctly. Incorrect formatting can lead to performance issues.
Pro Tip: Regularly Maintain Your Storage: Just like your iPad, your external storage needs some TLC. Regularly check for any firmware updates for your storage device and keep it clean and dust-free.
By paying attention to these details and choosing the right storage solution for your needs, you can ensure that your iPad and external storage work together at top speed. In the next section, we’ll cover how to keep your data safe and secure.
Security and Reliability
Ensuring the security and reliability of your data is paramount, especially when you’re entrusting precious memories or important documents to external storage. Let’s explore how you can keep your files safe and ensure your storage solution stands the test of time.
Keeping Your Data Secure
- Use Password Protection: If your external storage device offers password protection or encryption, make sure to take advantage of these features.
- Be Cautious with Sensitive Information: Think twice before storing sensitive or personal information on external storage, especially if it’s not encrypted.
Ensuring Reliability
- Choose Trusted Brands: When purchasing an external storage device, opt for reputable brands known for their reliability.
- Keep Software and Firmware Updated: Ensure that any software or firmware associated with your external storage is kept up to date.
Data Backup: The Golden Rule
- Always Have a Backup: Never rely solely on one storage solution. Ensure you have backups of your most important files in another location, whether that’s another external storage device, your iPad, or a cloud service.
- Regularly Check Your Backups: Periodically check your backups to ensure they are complete and the data is accessible.
Handling and Storage
- Handle with Care: External storage devices, especially HDDs with moving parts, can be sensitive to drops and rough handling.
- Store in a Safe Location: When not in use, store your external storage device in a safe, dry place away from extreme temperatures.
Troubleshooting and Maintenance
- Keep an Eye on Health: Some external storage devices come with software that can help monitor the health of the device. Make use of these tools to catch any potential issues early.
- Know When to Upgrade: Technology evolves, and storage devices wear out. If your external storage is showing signs of age, it might be time to upgrade to a newer, more reliable solution.
Pro Tip: Label Your Storage: If you’re using multiple external storage devices, label them clearly so you know what’s on each one. This not only helps you stay organized but also ensures you’re handling and storing each device properly.
By taking these steps to ensure the security and reliability of your external storage, you can rest easy knowing your data is safe and your iPad experience remains smooth and enjoyable. In the next section, we’ll wrap things up and look at the cost and availability of external storage solutions.
“At Techable.com, we pride ourselves on breathing new life into premium Apple products. Dive into our collection of expertly refurbished iPads, MacBook Pros, MacBooks, MacBook Airs, Mac Pros, iPhones, and other select devices. Each product undergoes rigorous quality checks to ensure it meets our high standards, ensuring you receive the best of Apple without the premium price tag. And because we stand firmly behind the quality of our products, we offer an industry-leading warranty of up to 3 years on our devices. Still on the fence? Our 30-day return policy ensures peace of mind with every purchase. Choose Techable, where quality meets affordability.”