 Diane
Diane


If you are looking for ways on how to transfer photos from iPhone to Mac then you are in the right place. Smartphone cameras have always been an important feature for us. As time has passed, these improved cameras have become more essential in our lives. The iPhones have been famous for their cameras.
We can capture some quality moments, edit, and share them. However, eventually, you will want to get those photographs off of your iPhone and onto your Mac or PC.
When you take a lot of photographs with your iPhone, there are a couple of issues you will encounter. Either the storage space in your iPhone will fill up, or you want to access the photos from other devices. To help you with this, there are many approaches to synchronize your photos with a Mac.
All these ways are easy to use and will assist you to free your storage space, backup the data, and can have access via other devices. You can move your content either through cable or wirelessly. Sounds good?
Here are the different ways to transfer photos from iPhone to Mac
- Transfer photos via the Photos app
- Transfer photos via Any Trans
- Transfer photos from iPhone to a Mac via Image Capture
- Move photos via Airdrop
- Move photos from iPhone to Mac via iCloud Photos
- Transfer photos via iCloud Files
- Transfer photos via email or iMessage
- Transfer photos Using Photo Stream
- Transfer photo via Dropbox
1. Transfer Photos via the Photos App:
The first method is probably the quickest and easiest of all. In this, you have to plug a USB cable that you use to charge your iPhone into the Mac’s USB port. The macOS Photos app will come automatically when your iPhone is connected. It will then recommend you to import photos from iPhone to Mac.
Unlock your iPhone, and confirm to trust the device if asked. The Photos application will load and show you the pictures from your iPhone in the window. If that doesn’t occur, select your iPhone from the left-hand menu in the Photos application. Now you can easily see all the pictures and videos that are saved in your camera roll.
The next step is to import All New Items in the upper right-hand corner or you can also go through the photos. Select the ones you need to import, and snap Import Selected. Once it is done, you can ask Photos to consequently delete the pics on your iPhone. It will provide you with more space to take pictures.

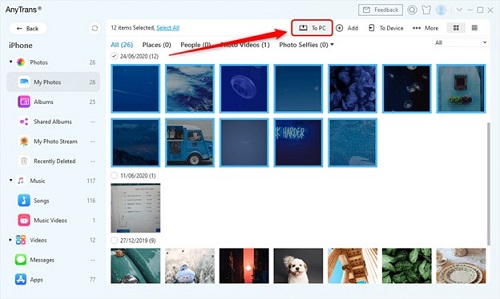
2. Transfer Photos via AnyTrans:
If you want to move all your content from your iPhone without waiting and want to back up at the same time, then this method is for you. A third-party app like AnyTrans will move all your content. First, you have to download this app and connect both devices to the same network.
Connect your iPhone to your Mac through cable. Open the app and click on Device Manager Mode. Then click on the photos option. Select the photos which you want to transfer from iPhone to Mac. And snap on to the PC button at the upper-right corner.
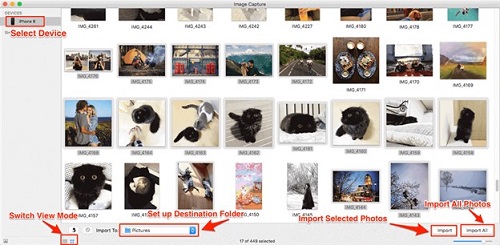
3. Transfer Photos from iPhone to a Mac via Image Capture
Image Capture is a default app on macOS. It’s helpful when you want to assess your photos but Mac is having a problem recognizing the device you’re trying to connect. You will need cable for this method too. Image Capture is also helpful for experienced photographers for organizing their photos in a folder that is kept separate from the Photos library.
For this method, you have to plug your iPhone into Mac and open Image Capture. You can also press Command + Space and type the image to find the app. If it is necessary, unlock your iPhone when you see it is connected. Wait for some time till it transfers all the photos.
After that, you’ll see a list of your photographs with file sizes, file types, etc. This data will be valuable for more proficient photographers. You can either use the Import All option or select individual photos that you need to import. Image Capture will by default import your photos into the Pictures folder on your Mac. It is different from the Photos app. When a picture has been imported, you will see a green tick in the base right corner.
4. Move photos via Airdrop
Another method to upload photos from iPhone to Mac is through Airdrop. It lets you transfer documents among iOS and OS X gadgets over your local network. To utilize Airdrop, both your iPhone and Mac should be connected to the same Wi-Fi network, and both need to have Bluetooth turned on. Your Mac should be running OS X Yosemite or a new version for iOS to OS X AirDrop to work. And your iPhone needs to have iOS 8 or later versions.
How will you AirDrop from iPhone to Mac? You have to swipe up from the bottom of the screen on the iPhone to raise the Control Center. Then tap the “AirDrop” button. If Airdrop says Contact only, then you can easily send between your own devices or to the sender in your contact list. But if you want to transfer to someone who isn’t in your contacts then select the Everyone in Airdrop icon. Now you are ready to import photos from iPhone to Mac.
Open Photos on your iPhone. Select the photos that you want to transfer. Then look under Airdrop for the Mac you want to transfer to when you see the share screen. Tap the symbol for your Mac in the AirDrop segment and the photo will be sent. The pictures will be saved in your Download folder which you can access from the Dock.

5. Move Photos from iPhone to Mac via iCloud Photos
iCloud Photos is Apple’s online storage platform for photos and videos. It is one of the simplest and fastest ways to move photos from iPhone to Mac without the use of a cable. When you will initiate iCloud Photos, all your iPhone pictures will automatically store in iCloud gadgets including Mac and iPad.
With iCloud Photo Library, all your pictures will update on all your gadgets as you take new pictures. So it will keep you away from the hazard of copying your photos from one device to another. It will likewise synchronize edit and changes made to the photographs. Like if you crop a photo on your Mac, it will also crop the picture on your iPhone.
You will get 5GB of iCloud storage for free but when that maxes out, your photographs can no longer stay in your sync devices. For that, you will have to pay for the additional storage for a large photo library.
To import photos, you have to go to Settings on your iPhone and click photos. Check the box next to iCloud photos as it will automatically transfer and store all your photographs in iCloud. This will help you see them on any gadget. You will likewise need to set up the iCloud Photo Library on your Mac.
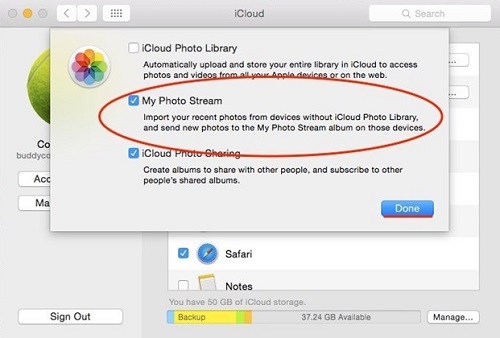
Open Photos and Snap-on Photos on the menu then click on Preferences. Check the box next to iCloud Photos. Your Mac and iPhone photograph libraries will now begin to sync up so you can see all your photographs on the two gadgets.

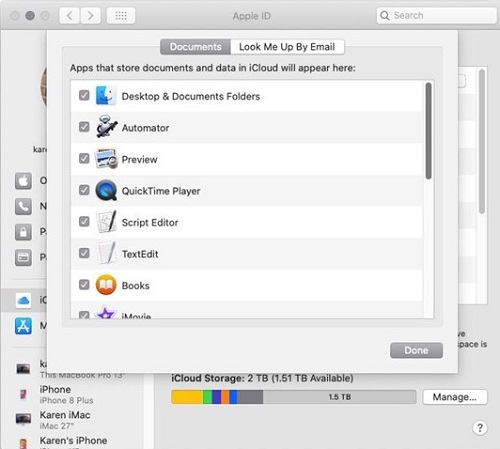
6. Transfer Photos via iCloud Files
iCloud Drive is a very useful utility that permits you to expand your capacity limit on your MacBook’s or iPhone’s RAM. And it also synchronizes all your Apple gadgets. It gives 50GB of memory space for free and you can even expand it up to 2GB at a reasonable cost. You can also backup all your pictures and videos through iCloud Files.
All your devices should be updated for transferring photos via iCloud files. On your Mac, go to System Preferences and Snap-on Apple ID. It will open up the iCloud settings. Then go to iCloud Drive and click on Options. You will have a Desktop and Documents folder, check that.
Now, open Photos on your iPhone. Select the pictures you need to share and tap on the Share button. Next is scroll down to Share to Files. After that, your iCloud Drive will open and you can see all the folders you have on your drive. Click on the folder where you need to add the photos. Finally, click on Save.
7. Transfer Photos via Email or iMessage
You can utilize your email or Apple’s own iMessage to move photos from your iPhone to your Mac. This step has one con related to the size and number of pictures. The size and number of pictures that you can attach to one email are restricted.
As a result, this method will make it less convenient to download photos from iPhone to a computer. However, this can be your last resort if something happens to your PC. You can later restore your pictures by downloading them from emails on any gadget.
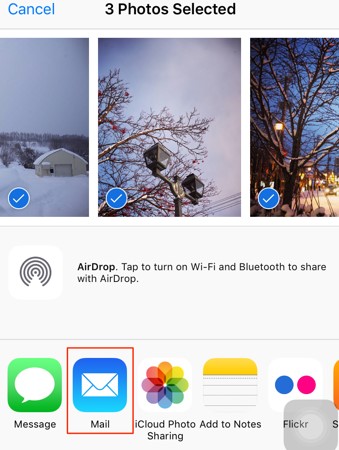
To transfer pictures via email, you have to select the pictures that you wish to move. Then click on the share icon which is in the base left corner of the screen. From there, select an email from the options that show up. Before this, you have to sign in to your mail account. Now, send the email.
8. Transfer Photos Using Photo Stream
Photo Stream doesn’t take up any iCloud Storage packages. Photos will show up in Photo Stream for just 30 days. It synchronizes the latest 1000 pictures between your iPhone, iPad, iPod, and Mac. Photo Stream doesn’t transfer your recordings, however, you can see your photos over your gadgets easily. When your device is connected to Wi-Fi, it will automatically transfer photos from iPhone to Mac.
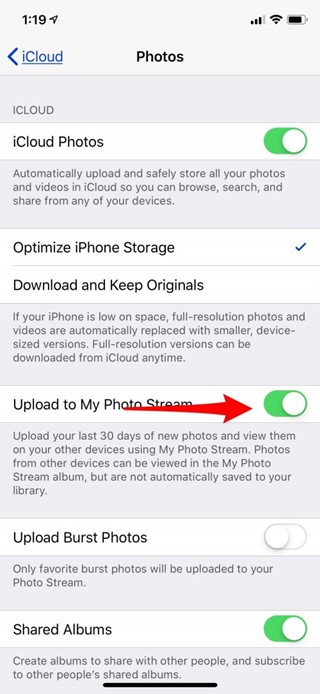
To start off My Photo Stream on the iPhone, you have to go to Settings. Click on your Apple ID, and then on photos next to Cloud. Next, swipe next to “Transfer to My Photo Stream.” After setting up on your iPhone, open System Preferences from the Apple menu at the top of your Mac. Sign in your iCloud Id and then tap Options close to Photos. Check the box close to My Photo Stream and click done.
After the pictures have been synchronized, you can download the photos on your gadget and erase them from the folder. This will erase the pictures from the cloud. However, it will remain on your device.
9. Transfer Photo via Dropbox
You must be familiar with Dropbox which is used for transferring large files between your devices. But on the other hand, it’s also a great alternative to transferring photographs from iPhone to Mac for yourself. Dropbox is a cloud-based storage app that is accessible for both your iPhone and Mac. The Dropbox account gives you free 2 GB of space for your pictures, videos, or any other documents.
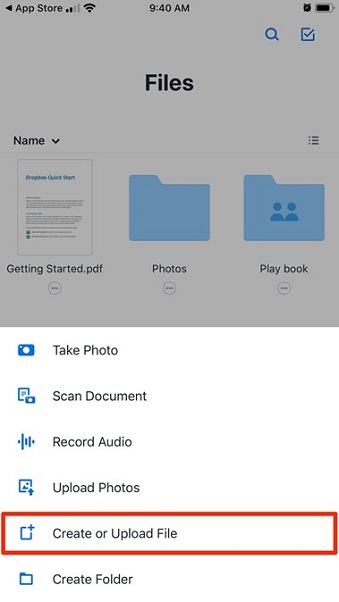
You first need to make an account on your iPhone to copy photos from iPhone to mac. Download the Dropbox app from the Apple store. After installing, open it and allow its access to your photos. Then tap on the + (create) button to upload photos from the menu. Select the photos which you need to transfer and store it in the Dropbox folder. Lastly, hit on the upload button.
After this, you need to visit dropbox.com on your Mac. After signing in, choose the pictures you want to download. Click on the download from the menu on the right side of the screen. Here you go, all files will be now saved in the Download folder on your Mac.
Final Words:
In closing, these are the best and easiest ways with regards to how to move photos from iPhone to Mac. You can either move it through the Photo app, Any Trans app, Image capture, or via email, Dropbox, Airdrop, and so on. All of these steps are really simple to use. Regardless of whether you want to free up space on your iPhone, or simply need a safe spot to store your pictures, you will in the end know how to do it while using your Apple gadgets.
 Adrienne Blanier


 Adrienne Blanier


 Ronald Uy


 Leah H. Blanchard


0 Comments