How to Take a Screenshot on a Mac?
If you own an Apple MAC, then you already know that I can do everything that a normal computer user might want their personal computer to do. One thing that you might want to do with your computer is to take a screenshot on Mac.
So that you can share it with others, or simply save it to use in the future. Apart from a single screenshot of the entire screen, MAC offers you a number of different techniques through which you can take a variety of screenshots, which will save a section, instead of the whole screen.
How to Take a Screenshot on Mac?
There are a number of ways in which you can take a MacBook screenshot. Some of those ways are as explained below.
Method 1:
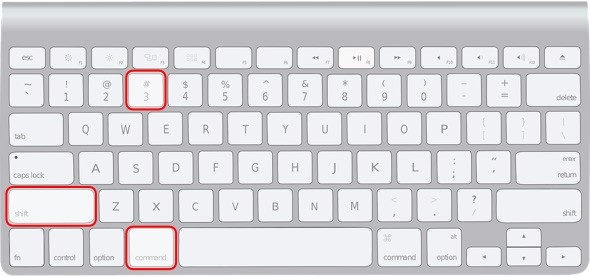
With the help of this method, you can take a screenshot of the entire screen. The first thing that you will need to do is to open the screen whose screenshot you want to take. Once you have opened the screen, press the Command+Shift+3 at the same time. You will hear the camera shutter sound of your mac. The screenshot of the entire screen that is open at that moment will be taken and it will be saved to the desktop of your mac.
How to Screenshot on Mac and save it to the Clipboard?
If instead of saving the screenshot as an image on the desktop, you want to copy it to the clipboard, follow the method mentioned below.
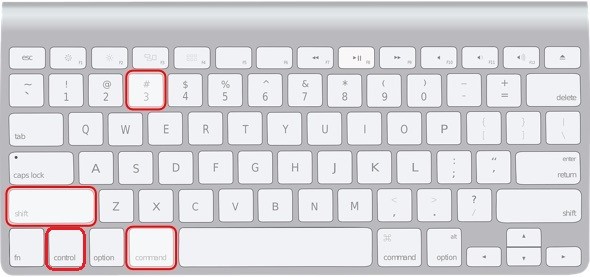
Make sure that you have opened the screen that you want to save. Now press Command+Control+Shift+3. Instead of saving a screenshot to the desktop, it will be saved on the temporary storage, which is also known as a clipboard. Now you can open the clipboard whenever you want simply by pressing Command + V and you can paste pictures from the clipboard.
Method 2:
If instead of taking the screenshot of the entire screen, you are wondering how to screenshot on a mac of a specific area of the screen, follow the given method below.
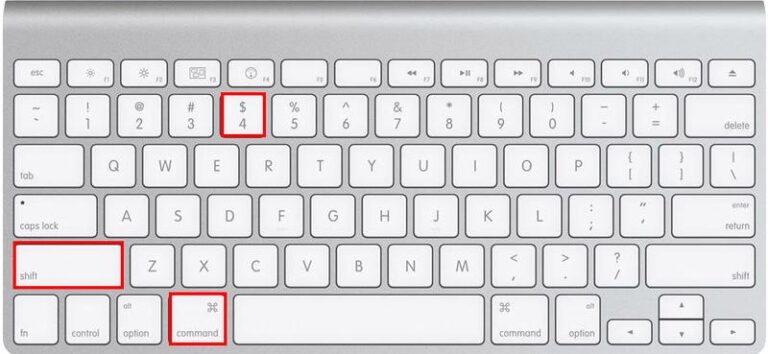
Press Command+Shift+4. When you have pressed these buttons, the cursor will change to a crosshair pointer.
Now click and without leaving the click, drag the pointer to the whole area of the screen that you want to save. As soon as you have selected all the areas, let go of the click. When you do that, you will be able to hear a camera shutter sound and the area that you have selected will be saved in the form of a picture on your desktop.
Saving a Screenshot of a Specific Section on the Clipboard:
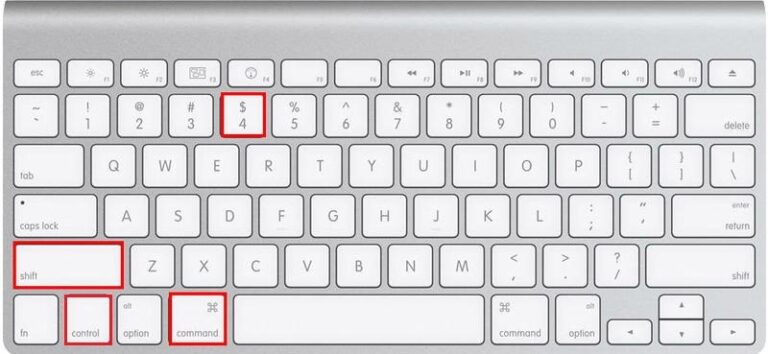
If instead of saving the screenshot of the area in the form of a picture, you want to save it to the clipboard, follow the method mentioned below.
Press Command+Control+Shift+4. The cursor will be changed to a crosshair pointer. Now click and drag the mouse to the area of the screen that you want to save. Once you do that, the area will be highlighted. The entire area will now be saved to the clipboard. Anytime that you want to open the clipboard, all you have to do is to press Command + V.
Method 3:
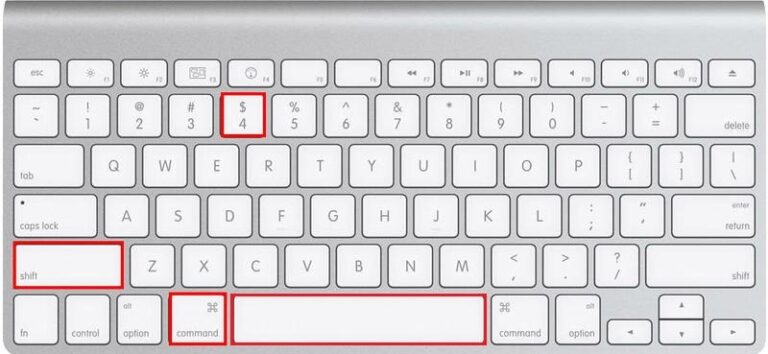
If you want to take a screenshot of a specific window on your screen, then you can do that on a mac as well. For that, you will need to press Command+Shift+4, the cursor will change to a crosshair pointer. Now if you press the spacebar, the pointer will change into a camera pointer instead.
Now move the camera pointer to the window that you want to screenshot and it will be highlighted. Once you click it, you will hear a camera shutter sound and the screenshot will be saved in the form of an image to the desktop of your screen.
Method 4:
If your Apple Mac comes with a touch bar, you can also take a screenshot of the touch bar as well. If you want to take a screenshot of the touch bar, all you have to do is to press Command+Shift+6. The image will be saved to the desktop in the form of a .png file.
In case that your mac does not have a touch bar, pressing these keys will not do anything.
Method 5:
Apart from the above-mentioned methods about how to screen record on mac, you can also use a third party software as well. There are a number of software that you can get for some fee but apart from them, there is numerous other software that comes absolutely free. All you have to do is to get those software and install them in your MAC.
Conclusion:
We hope that with the help of the methods mentioned above, you can easily take a screenshot of the whole screen, a specific area of your screen, or a specific window on the screen. You can also use method 4 for taking a screenshot of the touch bar as well.
In case you are using the 5th method, it is always recommended to buy the software. Even if you have chosen software that is free, always download it from a trusted website because otherwise, it might harm your computer because software from an untrusted website might contain malware.













0 Comments