Backing up your data is one of the most crucial things to do. You can lose the data through various ways like disk failure, lost or stolen PCs, accidentally deleting the file, and so on. Having multiple backups can be the only way that will ensure you can restore your important data quickly. You can back up the data by using any local hard drives, network devices or you can use online backup services too.
Regardless of whether you’re a new Mac user or have been utilizing it for quite a long time, there’s one feature that you should know about it and how to use it. That feature is Time Machine which is built-into Mac OS X and macOS. It is a backup application that is used to keep the latest copy of all the files on your Mac.
Time Machine is remarkable among the other backup applications as it can capture precisely what is in your Mac and also makes it easy to recover all the lost or deleted data. What it does is surprising but it is very easy to set Time Machine as well as using it too. In this guide, we will tell you more about what a Time Machine is, how will it work, and how to use it.
What is a Time Machine?
As already mentioned, Time Machine is macOS’s built-in app. It is very easy to use and can automatically back-up your Mac after every hour. As long as you have space in your mac, it basically makes
- Hourly backup for the past 24hours
- Daily backups for the past month
- Weekly backup for all previous months
But if you run out of space, then Time Machine will delete the oldest backups so that more space is available for it.
You have to only set up the Time Machine. After that, it will automatically work. Time Machine runs in the background on Mac’s desktop. And if you are using laptops and are unable to perform backups every hour, then your Mac stores snapshots. It will then back up when your Time Machine is available.
So simply plug in your Time Machine drive to back up your mac when you come home from work or meetings. You can use a small, portable hard drive if you are using laptops. Thus, with time machine backups, you can easily continue from where you have left. You can access the Time machine from both your System Preferences menu as well as an App for the Mac.
Why Should You Use It?
So why should you use it? Time machines will periodically create backups of the changes you are making every day. Suppose you have been working on something for 5 days. If you want to retrieve a version of a file that you made changes on day 2, you can easily get it even after you have made several changes on the file in the next few days. This is because a time machine stores multiple copies of your work whenever you are using it.
Secondly, if you want a new Mac, you can easily copy all your data from your previous computer with Time Machine. It will save you from the effort of manually transferring all your data.
Type of External Storage Devices Used with Time Machine:
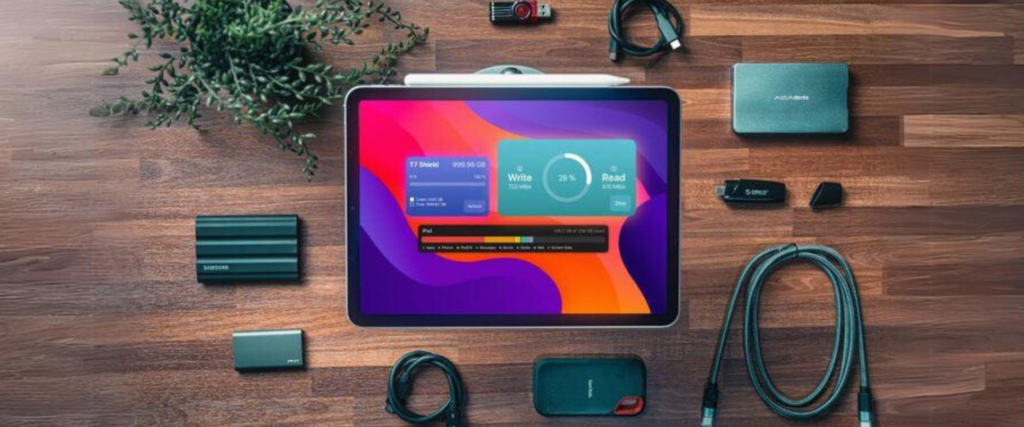
First, you need to have a backup destination where you want your files to be backed, before setting up Time Machine. Time Machine can use many devices to back up the data. Following are the storage devices that are used as backup disks:
- An external USB, Thunderbolt, or FireWire drive that can be connected with your Mac
- An external drive or SSD that can connect with an AirPort Extreme Base Station or AirPort Time Capsule
- By using AirPort Time Capsule
- Mac which is shared as a Time Machine backup destination
- Network-attached storage (NAS) gadget which supports Time Machine
How to Set Up a Time Machine:
It is simple to set up Time Machine with a properly formatted and an empty external drive. All you have to do is to go to the menu bar in Mac and select the Apple logo. You will see System Preferences from the menu, click on it. Then select Time Machine.
If you are using it for the first time, then you will be asked if you need to use that drive to back up your Mac through Time Machine.
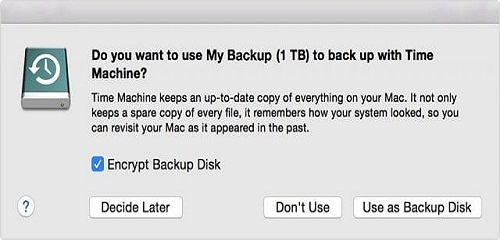
So, to use the drive as the backup disk, you have to click on the ‘Use as Backup disk’ button which will begin the initial backup. That was simple, right?
If you are using it again, then simply turn on the feature by clicking on Backup Automatically and then select a drive where you want to back up the data. This could be any hard drive connected to mac, or a network drive. It is better to also check the Encrypt Backup disk for additional protection. And if your disk isn’t formatted, then you can erase the disk to format it. Note that all the data will be removed from the disk.
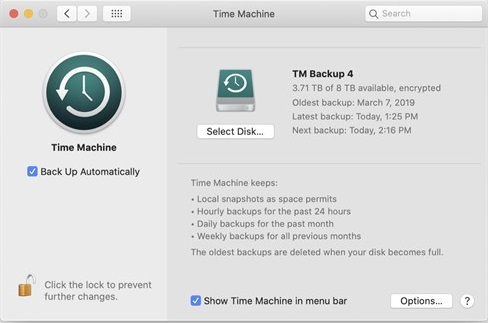
After this step, you can also check ‘Show Time Machine’ in the menu bar so that you can access it with a small extra menu display on your screen. You can then easily use this to launch a backup, stop a backup, or even to Enter Time Machine.
Time machine, by default, backs up everything that is available on your Mac and also in all external drives that are connected to it. Therefore, you can choose which items you want to back up by Time Machine. For that, you have to go to Options and then click on the + button. It will navigate to folders that you want to exclude from the Time Machine. Like, you can save space in your Time Machine drive by excluding the folder which contains large files that you can back up via other means. You can back it up in Dropbox, OneDrive, or Google Drive as it is accessible everywhere. It is better that you don’t exclude system files and applications so that you won’t face a problem when you restore your Mac by using Time Machine.
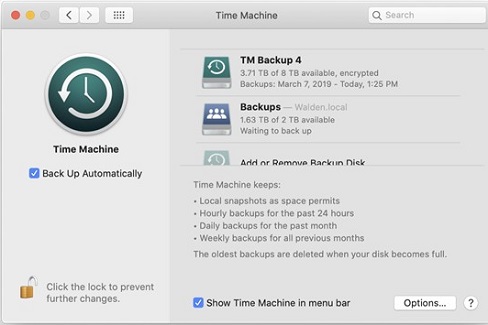
Another way to protect the data can be that you can use two drives for Time Machine backups. You will then have to click on Add or Remove Backup Disk in order to have that second drive. As Time Machine will every time alternate the drives you’ve selected when it runs.
Use Time Machine with an Apple AirPort Time Capsule:
Apple’s AirPort Time Capsule is a fascinating hybrid device. This implies that you can use it as a backup external drive as well as a Wi-Fi router. The wireless feature is really useful with MacBook Line as these laptops don’t need to be physically connected to a device for backup.
The Airport Time Capsule should be set up properly before using it for Time Machine backups. Once you are done, you have to go to System Preferences in the Dock. Then select Time Machine. The preference pane will look like this.
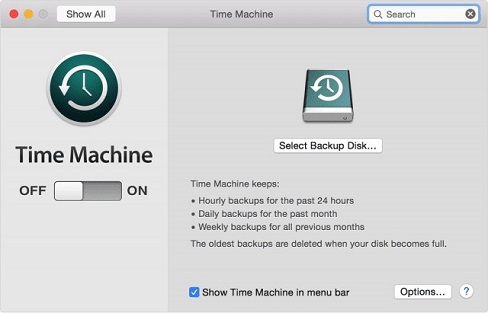
Now, click on the “Select Backup Disk” button. A window will appear which will be similar to the screen below.
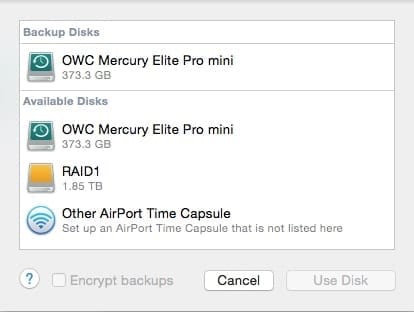
Click on the ‘Airport Time capsule’ that will be listed in the available disks. If it is not available then click on the ‘Other Airport Time Capsule’ to select it. After you have selected it, then click on the “Use Disk” button. You can also select to encrypt your backup. Here you can check the box next to “Show Time Machine in menu bar” from the options. If you don’t want to know about the backup process, then you just uncheck that box. Furthermore, if you see that the Time Machine Off/On button is in the off position, then click on it to turn it ON. The backup will begin.
The Initial Backup:
Now comes the most awaiting part as to how this backup process continues. You can still continue working on your Mac while the Time Machine is doing the backup. Be sure to leave your Mac on so that Time Machine can capture all of the information. Once the first backup is complete, you’ll see a notification that will state that Time Machine has finished the first backup as shown below.

This process is much faster when you will run an Ethernet cable between an Ethernet port on your Mac and on the AirPort Time Capsule.
Everyday Backups:
After the initial backup is completed, Time Machine will now automatically start to back up any files that have changed on the Mac since the last backup. It does this every hour as long as you have a connection between the Mac and the backup destination. Time Machine backups will also perform their function even when the MacBook is set up with Power Nap.
If you didn’t uncheck the “Show Time Machine in the menu bar”, you will see the following icon under different conditions:
This icon will indicate that the Time Machine is currently idle.
The extra arrow in this icon will indicate that the Time Machine is currently working on a backup. If you have an older version of Time Machine, then you will see the arrow moving in a circle. This might distract some users.
If you see either one of these icons, it will indicate that something has happened which is preventing Time Machine from backing up. You can check what is causing the problem by clicking on the Time Machine menu bar icon.
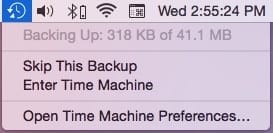
After completing your work, you can also make sure that whether it’s safe from a possible drive failure on your Mac or not. For that, you can manually start a Time Machine backup. Simply go to the Time Machine menu, and then select the “Back up now” to start it. It is good if you sometimes verify the backup disk to keep a check on it. You can find verifying backups in the options menu.
How to Restore Files from Time Machine Backups:
If you want to restore files from the backups in Time Machine, then you have to go to the Spotlight search and enter “Time Machine”.
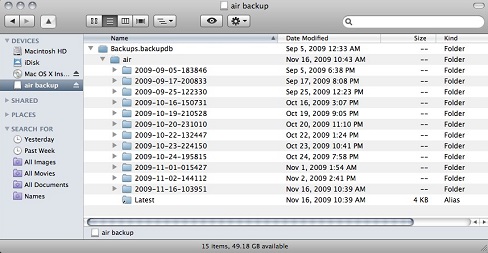
A window will appear on which you can scroll through the timeline on the right site or you can even search for a specific file. After highlighting the file, you have to press the space bar for a quick look at it or you can click on the “Restore” button to copy the file back to the appropriate folder.
Time Machine can also restore all the data in the system at once. For this, when your Mac is restarting, you have to hold down the Command and R keys simultaneously. And then release the keys when the Apple logo appears on the screen. To begin the restoring process, click on the “Restore from a Time Machine Backup”.
How to Restore a New Mac with Time Machine:
Now we will discuss how you can restore your new Mac with Time Machine. Follow these steps:
- Firstly, you have to connect your backup disk with your new Mac. If you are using a Time Capsule, then you have to set your router and connect your new Mac to the same network. This will automatically “connect” your backup disk with your new Mac.
- Sign in to your new Mac and then select the “From a Mac, Time Machine backup, or startup disk” when you will be asked about how to transfer your data.
- You will select your backup disk from the available options in the next window.
- Click on “Continue”
- Now choose the data you want to transfer, and click on “Continue”
That’s all you have to do. Your Mac will now start to transfer all the selected data via the Time Machine backup.
Conclusion
It is very essential to back up your data to avoid losing as there are a number of factors that can cause data failure. You can never be too careful when it comes to such sensitive things that need to be taken care of. Time Machine is one of the backup applications which helps you to save all the information without any issues. It is time consuming but is worth it.
There are other options too like getting Backup Pro. It can compress backup more than the Time Machine. You can also use the Time Machine app with CleanMyMac X to know that your backups are clean and well-organized. Having read this article, you’ll be completely familiarized with what Time Machine is and how you can use it on your Mac with ease. Having said that, you should undergo all the steps mentioned above and make sure that your important data is safe from harm and is easily recoverable.








0 Comments