So, you’ve finally decided to jump aboard the MacBook Pro bandwagon. It can be a little bit tricky at first, especially for longtime Windows users. First time MacBook users may discover some subtle differences in terms of navigating the macOS interface. Switching can prove to be confusing at first, but a few hours of playing around with your laptop can quickly help you get the hang of it.
Whether you are a newbie or returnee, utilizing a MacBook Pro can be tricky. Let’s be real – macOS is not as convenient as Windows. It can eat you if you have not touched a Mac all your life. With this said, below are some tips to get you going on your MacBook journey.
MacBook Pro Tips – Getting Started
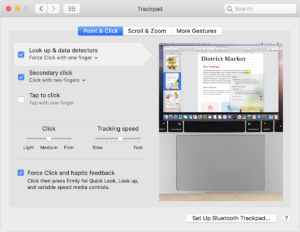
Multi-touch Gestures
Unique from other laptops, MacBook Pros are recognizable for their trackpads. These are large and don’t give the same feedback as Windows-based laptops. But this smooth-to-the-touch trackpad is a big contributor to the whole MacBook Pro experience.
Think about your tablet or smartphone and how you navigate it – that is how functional multi-touch gestures can be. While it is true that there are Windows 10 laptops with similarly features trackpads, no one does it the way Mac does.
With your multi-touch, you can hover your mouse pointer, or bring your thumb and index finger close to each other doing commands. That is how you expand everything in MacBook Pro, the way you would in your smartphone. If you want to bring it back to its original size, you just have to pinch it. You can explore this more by going to the Apple menu and then System Preferences.
The Keyboard
If this would be the first time you would be using a MacBook Pro, one of the first things you would notice is the feel of its keyboard. Start building a connection with the “command” button. You’ll quickly find out that you will be using it more often for sure. Other commands may look foreign to newbies. For example, we don’t use the “ctrl + c” to copy texts here, but instead – “cmd + c.” To master changes like this, polish your Mac Keyboard Shortcuts!
Knowing these shortcuts will not only make your life easier but also make you more productive with a MacBook Pro. It may take some time, but this is surely worth it.
Here is the complete list of Mac Keyboard Shortcuts.
Meet Siri!
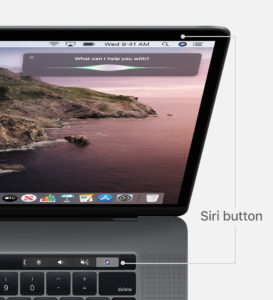
Anyone who has not heard of Siri must be living under a rock. This feature has been available on the iPhone for nearly a decade now and was launched with the macOS Sierra back in 2016. Siri plays a significant role in Apple’s ecosystem. It indeed came as a huge welcome when it came to the MacBook lineup.
To access Siri, simply hold the “Command + Space” keys down for a couple of seconds. If you’re uncomfortable with this, go to your Dock or Menu Bar and check the Siri icon, which is identical to its iPhone version.
Ask questions about the current weather conditions or the latest games — launch applications without moving a finger. You can also toggle system functions such as Bluetooth, and Wi-Fi, and pull up stored files for easy use. All of these are possible with Siri. All it takes is pressing Command + Space.
Take the Spotlight!
Spotlight allows you to perform basic calculations. That’s its primary use. However, with the introduction of the macOS High Sierra, it has since grown up and come with additional functions. You can now convert units when you need to know how many stones are there in a pound. Spotlight can be useful for people traveling abroad and need help when converting currencies. It can also suggest alternatives to come up with an answer.
Connect More Devices with Thunderbolt!
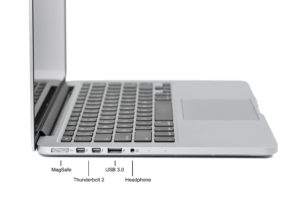
Inspect the unibody of your MacBook Pro. On the side, you will notice an unusually-shaped slot – that is the Thunderbolt port, and it is quite a distinct feature of MacBook Pros.
The port can charge your laptop. You can also plug in compatible devices like an external monitor, microphone, and drive with it. It is convenient for 13-inch MacBook Pro users with two Thunderbolt ports. If you need to record audio with an external mic and have an external monitor for viewing, Thunderbolt extensions can increase the number of available ports.
Screenshots
Windows users would surely agree that taking screenshots on their laptops takes a lot of effort. They still have to press the PrtSc key to capture the screen or download a Snipping Tool if they only prefer a particular part of the image. But not with Mac.
Apple has streamlined the process of screen capturing. It is simple with MacBook Pros. You just have to press “command + shift + 3”, if you want to capture the entire screen. However, if you only need a portion of it, go to “command + shift + 4”. A crosshair will appear. Just tap and drag the area that you need to take an image.
For those with the new MacBook Pro that has a Touch Bar, press the “Shift + Command + 6” buttons. It only goes to show that with Mac, it only takes a matter of memorizing some keystroke combinations to get a screenshot. It is as easy as that!
A Collection of Emojis
Who does not love to express through emojis? Whether you are a Millennial or a Gen Z, you have surely used this feature at least once. The exotic characters of Mac are pretty amazing. They have a broad range of special characters that you will not find anywhere.
The MacBook Pro has an interesting collection of emojis. If you want to see them, you just have to press “Control + Command + Space.” You only have to tap the emoji to work. Other applications would ask you to drag the emoji in place.
Digital Signature
Gone were the days when you had to get a piece of paper, sign it, then scan it back to attach your signature in an email. While this may be happening on other laptops, not with the MacBook Pro. Its trackpad got you all covered, among many other options.
To do this, drag the PDF that you are attaching to the email. Once you hover over it, you will come across a little button at the top right. Click it to find a wide array of Markup options, which feature one for the document signature. It is not the only way to do this. You can hold a piece of paper in front of your webcam, then cut the background or sign directly to your trackpad. Your iPad stylus also does wonders! Use that instead of your finger and see the difference!
Connectivity
It is usual to stumble upon the Share button that looks like an arrow up out of a box in OS X and macOS. But the difference with Mac is that it actually tracks your sharing activity and takes note of whom and how you often share files.
Meaning, that if you are fond of sharing links with a friend or AirDropping files with people close to you, these trails will all be recorded, and they will probably get stuck at the bottom of your share menu so that it is easier for you to see them again next time.
Find your apps!
You will discover more about your MacBook as you use and explore it regularly. For starters, though, and to make your experience easier, you can always launch Finder and head to Applications to have an overview of the apps waiting for you to discover.
Click on the grey rocket icon in the dock to see the applications right away. That is how you access the LaunchPad without a hard time. You can scroll sideways, horizontally, with your two fingers to see what’s available for you. Then you are free to select!
If you want to personalize this option, you can assign a keyboard shortcut for LaunchPad. Go to System Preferences + Keyboards + Shortcuts + LaunchPad & Dock to do this.
That’s it! Limitless features are waiting for you. Welcome to MacBook Pro and make the most of your device!
Click here for more MacBook Pro Tips and Tricks.












0 Comments